
How to Prevent Frost in Walk-In Freezers
October 16, 2026
Table of Contents
- Understanding Common Causes of Frost Buildup
- Inspect and Repair Walk-In Freezer Door Gasket Problems
- Walk-In Freezer Defrost Cycle Troubleshooting
- Address Walk-In Freezer Evaporator Coil Icing
- Systematic Prevention: A Walk-In Freezer Maintenance Checklist
- Upgrade to Heated Frames and Anti-Condensate Protection
- Frequently Asked Questions
Last Updated: October 16, 2026
Understanding Common Causes of Frost Buildup
Understanding how to prevent frost in walk in freezers starts with recognizing that frost builds up because something in your operation introduces moisture, warm air, or both into the cold space.
The most common culprits are warm air infiltration, humidity, and defrost cycle problems. Identify which one drives your frost problem, and you can fix it directly instead of chasing symptoms.
Warm Air Infiltration and Door Traffic
Every time a door opens, warm outside air carrying moisture rushes in. When it hits cold surfaces, the moisture condenses and freezes.
High-traffic kitchens are especially vulnerable: a door opening 20 times per hour introduces far more warm air than one opening 5 times per day.
Train staff to open the door only when necessary and close it quickly, and post a reminder near the door. Simple, but it works.
Moisture and Humidity Sources
Moisture also comes from inside. Warm food placed directly into the freezer releases steam, and uncovered products keep releasing moisture as they cool.
High ambient humidity makes it worse: on a hot, humid day the temperature difference is larger, so more moisture condenses when the door opens.
The fix has two parts: reduce moisture sources and control humidity.
Inspect and Repair Walk-In Freezer Door Gasket Problems
A failing door gasket is one of the fastest ways to develop a frost problem. If the seal isn't tight, warm air leaks in continuously even when the door is closed, and frost builds faster than the system can manage.
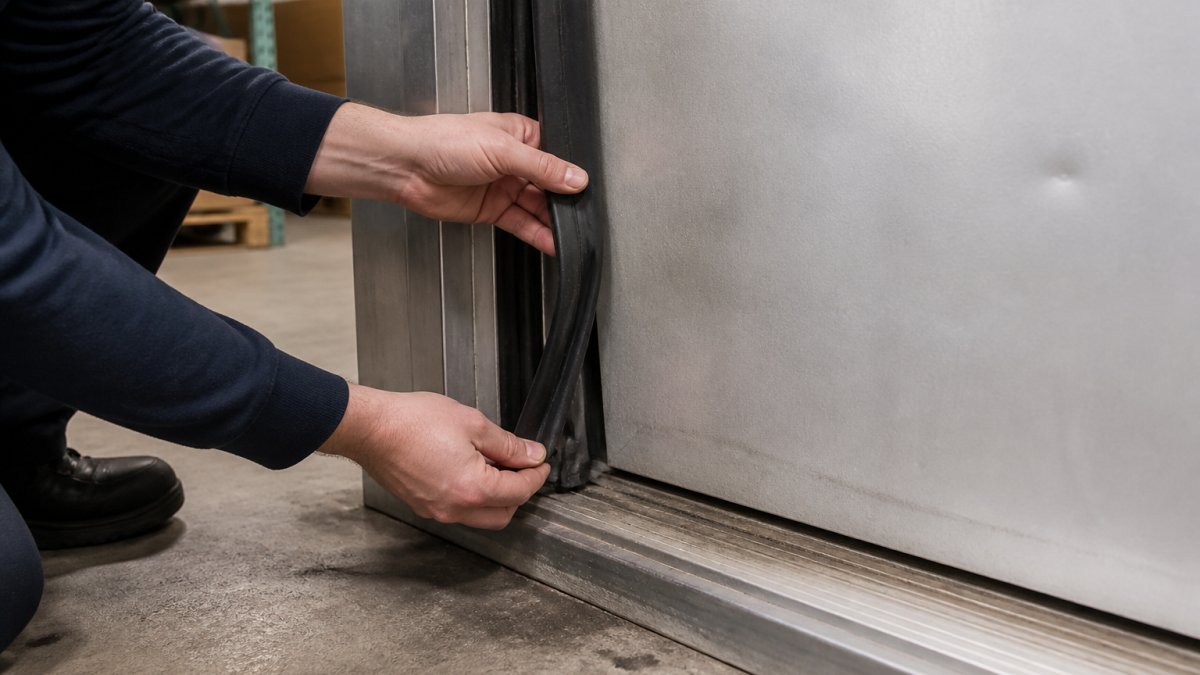
Visual Inspection of Seals and Thresholds
Start with a visual check of the gasket around the entire frame, looking for cracks, tears, hardening, or rubber pulling away from the frame.
Check the bottom seal especially carefully, that's where most gaskets fail first.
Inspect the threshold too: gaps let warm air infiltrate directly, and debris or ice buildup prevents a proper seal.
Testing Door Seal Integrity
Close the door on a piece of paper or a dollar bill and try to pull it out.
Test at multiple points, top, both sides, and bottom. A seal that fails in one spot leaks air throughout that section.
For a second test, slowly move your hand around the closed door frame from the outside and feel for air movement.
Walk-In Freezer Defrost Cycle Troubleshooting
The defrost cycle melts frost off the evaporator coil on a timer, then a termination control ends the heat before the coil warms too far. When any link fails, frost stops clearing and the coil ices over. Separate a defrost fault from door-infiltration or airflow problems before touching a setting.
Symptom-to-Cause Map
Work through this sequence before calling anyone, it follows a technician's first-visit logic.
- Frost is heaviest on the coil but the box holds temperature. Defrost is running but not terminating correctly, or the drain is blocked and refreezing. Check the drain first.
- Frost is heaviest near the door and threshold, coil looks normal. This is infiltration, not defrost. Go back to the gasket and threshold inspection.
- Coil is clear but the box runs long and warm. Airflow or refrigerant charge, not defrost. Check fan operation and product loading.
- Coil is a solid block of ice and the fan is silent or straining. Defrost has failed outright. This is a technician call.
- Ice forms in a ring around the drain pan or under the coil. Drain line freeze-up. The pan heater or drain heater may have failed.
Defrost Schedule and Termination Settings
Most commercial walk-in freezers run 2 to 4 defrost cycles per day, typically 20 to 30 minutes each, scheduled around low-traffic hours.
Termination matters most. A time-terminated cycle runs a fixed duration whether or not the coil is clear; a temperature-terminated cycle uses a coil sensor and ends the heat at a set point.
What You Can Check Safely
These checks need no tools and no panel access:
- Confirm the defrost schedule on the controller display matches your operating hours.
- Listen for the compressor and fan cycling off during the defrost window.
- Watch the drain line during and after a cycle for water flow.
Technician-Only Boundaries
Stop and call a qualified refrigeration technician before you:
- Open the control panel or change any defrost timer, termination set point, or sensor offset.
- Test or replace a defrost heater, termination sensor, or defrost control board.
- Add, recover, or adjust refrigerant.
These tasks involve line voltage, federally regulated refrigerant handling, and food-safety-critical settings. A wrong adjustment can push box temperature above safe holding limits without warning.
Documenting Defrost Performance
Keep a simple log: date, cycle start and end times, coil appearance before and after, and any temperature excursion. After two weeks the pattern shows whether the problem is schedule, termination, drain, or something outside the defrost system, and gives a technician a head start.
Walk-In Freezer Sliding Door 96" x 96" — Prehung with Heated Jamb Sandwich Frame →
Address Walk-In Freezer Evaporator Coil Icing
The evaporator coil is where heat leaves the box. Because the coil surface sits below freezing, some frost is normal. The problem starts when frost builds faster than defrost removes it: the coil becomes an insulator, airflow drops, and the system runs longer to hold temperature.
Recognizing Coil Frost Load and Airflow Issues
Light, even frost across the fins is normal between cycles. What you are looking for is uneven or heavy buildup:
- Thick frost on the lower half of the coil only. Often a drain or pan issue pulling moisture back up.
- Frost concentrated on the return-bend side. Usually a refrigerant or airflow distribution problem.
- A solid block with no visible fins. Defrost has failed. Stop running the box and call a technician.
Commercial Operating Targets and Measurement
These are general ranges, not specifications, your manufacturer's manual and system design take precedence.
- Box temperature: Most commercial frozen storage targets 0°F or below, with a typical allowable swing of a few degrees. Verify with a calibrated thermometer, not the controller display alone.
- Door-open time: Track it. A common target in high-traffic operations is under 15 seconds per opening. Anything consistently over 30 seconds is a meaningful moisture load.
- Defrost performance: Coil should be visibly clear of heavy frost within 15 to 20 minutes after a cycle ends. If frost remains, defrost is under-performing.
Verifying Airflow
Airflow is the cheapest and most overlooked thing to check.
- Confirm the evaporator fan is running when the compressor runs. A fan that stops with the compressor is normal on some systems; a fan that never runs is not.
- Check that nothing is stacked against the fan discharge or blocking the return air path.
- Keep at least a few inches of clearance between stored product and the coil face.
- Inspect the fan guard for frost bridging. If ice has formed across the guard, airflow is already compromised.
- Listen for bearing noise or a fan that spins down unevenly, both signal a fan that needs service.
Safe Ice Removal and Recovery
If the coil is iced over, recover it without damaging the coil or the food.
- Never use sharp tools. No screwdrivers, no ice picks, no chisels. Coil punctures are expensive and release refrigerant.
- Never pour hot water directly on the coil. Thermal shock can crack a coil, and the water adds moisture that refreezes.
- Do not use a heat gun or torch. Localized heat can damage fins, wiring, and sensors.
When Coil Icing Points to a Bigger Problem
If the coil ices over repeatedly after a clean defrost and a verified door seal, the cause is usually a defrost fault, a refrigerant charge issue, or a fan/airflow problem. All three require a qualified technician, repeated manual defrosting treats the symptom and lets the fault worsen.
Systematic Prevention: A Walk-In Freezer Maintenance Checklist
Learning how to prevent frost in walk in freezers is easier than removing it once it has accumulated. This checklist covers daily, weekly, monthly, and seasonal tasks.
| Task | Frequency | Impact |
|---|---|---|
| Check door seals visually | Daily | Catches leaks early |
| Clean door frame and threshold | Weekly | Ensures tight seal |
| Test gasket with paper | Weekly | Confirms seal integrity |
| Inspect drain line opening | Monthly | Prevents blockages |
| Check temperature consistency | Weekly | Identifies coil problems |
| Remove visible frost buildup | As needed | Maintains airflow |
| Review defrost cycle logs | Monthly | Tracks system performance |
| Professional coil inspection | Annually | Prevents major issues |
Daily and Weekly Checks
Daily, visually inspect the door seal for cracks or gaps. Daylight around the closed frame means it needs repair.
Weekly, clean the door frame and threshold with a damp cloth to remove dust, debris, and ice, a clean threshold is essential for a good seal. Then run the paper test; it takes 30 seconds and reveals problems immediately.
Monthly and Seasonal Tasks
Monthly, pour water down the drain line to confirm it flows freely. A blocked drain backs up and refreezes inside the freezer.
Check the evaporator fan guard for frost or dust, confirm the fan spins freely if accessible, and listen for unusual noises during operation.
Seasonally, especially before heavy-use periods, have a technician inspect the coil and test the defrost cycle to prevent peak-season surprises.
Upgrade to Heated Frames and Anti-Condensate Protection
If frost persists despite maintenance, the door itself may be the issue.
Averon Cooling Solutions manufactures walk-in freezer doors with heated frame technology and replaceable anti-condensate heater wire.

A heated frame keeps the frame slightly above freezing, preventing condensation when warm, humid air enters.
Products like the Walk-In Freezer Replacement Door 72" x 84", Prehung with Heated Frame ($3,830.00) include both features as standard and arrive prehung with hardware installed and adjusted.
For larger openings, the Walk-In Freezer Sliding Door 96" x 96", Prehung with Heated Jamb Sandwich Frame ($10,350.00) provides heated frame protection on a larger scale.

For unusual opening sizes, Averon Cooling Solutions builds custom doors to your exact specifications, with heated frames and anti-condensate technology available.
Frequently Asked Questions
What causes frost to build up in a walk-in freezer?
Frost accumulates when warm, humid air enters the freezer through door leaks, frequent door openings, or moisture from warm food and products. The evaporator coil then converts this moisture to ice. Defrost cycles that don't run often enough or terminate improperly allow frost to build faster than it melts. Poor airflow around the evaporator fan and coil also traps frost on the coil surface instead of removing it during defrost.
How can a damaged door gasket lead to frost buildup?
A compromised gasket allows outside air and moisture to infiltrate continuously. Even small gaps let warm, humid air seep in around the door frame and threshold. This moisture condenses on cold surfaces and freezes. A magnetic gasket with a double-sweep bottom seal, like those on Averon's walk-in freezer replacement doors, creates a tight seal that stops this infiltration at the source.
How often should a walk-in freezer be defrosted?
Defrost frequency depends on door traffic, humidity, and food loading. Most commercial units run defrost cycles every 6 to 12 hours, typically at night or during low-traffic periods. Heavy-use freezers may need more frequent cycles. The defrost termination setting (when the cycle stops) is critical: it should end when the coil reaches a target temperature, not run too long and waste energy or too short and leave frost behind. Check your controller settings or consult your technician.
What temperature should a walk-in freezer be set to?
Walk-in freezers for food storage should maintain 0°F or below to ensure food safety and quality. Healthcare facilities and specialized storage may require different setpoints. Temperature fluctuations above 0°F encourage frost formation because the coil cycles on and off more frequently. Consistent temperature control, combined with proper humidity management, reduces unnecessary defrost cycles and frost buildup.
Frost buildup in walk-in freezers isn't inevitable. It's a symptom of specific problems: air leaks, moisture infiltration, or defrost cycle failures. Address these systematically, and you eliminate the frost. Averon Cooling Solutions helps facilities prevent frost at the source with custom-engineered doors featuring heated frames and anti-condensate technology. Get a quote for a replacement door built to your specifications and engineered for frost-free operation.