
Walk-in Freezer Door Gasket Replacement Options
October 08, 2026
Table of Contents
- Understanding Walk-in Freezer Door Gasket Replacement
- Freezer Door Gasket Types and Materials
- Measuring and Identifying Your Current Gasket
- Walk-in Freezer Door Frost Buildup and Gasket Performance
- Walk-in Freezer Door Gasket Installation and Removal
- OEM vs. Compatible Replacement Gaskets
- When to Replace the Entire Walk-in Freezer Replacement Door
- Custom-Size Gaskets for Non-Standard Openings
- Frequently Asked Questions
Last Updated: October 8, 2026
Understanding Walk-in Freezer Door Gasket Replacement
A walk-in freezer door gasket replacement prevents cold air loss and frost buildup on commercial refrigeration equipment. The rubber seal around your freezer door frame degrades from temperature cycling, moisture, and constant use. When it fails, the unit works harder, energy costs climb, and frost accumulates on the door.
At Averon Cooling Solutions, we work with restaurant owners, facilities managers, and warehouse operators facing this problem. Replacing a walk-in freezer door gasket is straightforward once you understand your options and take accurate measurements; the challenge is identifying which gasket type fits your door and frame.
This guide covers gasket types, measurement, installation, and the OEM versus compatible decision. Knowing how to select and install the right gasket saves downtime and prevents energy waste from a compromised seal.
Freezer Door Gasket Types and Materials
Commercial walk-in freezers use several gasket profiles, each designed for different door frame styles and performance requirements. Understanding the differences helps you order the correct replacement without guesswork.
Magnetic Gaskets
Magnetic gaskets contain embedded steel strips that seal against metal door frames. Common on modern commercial doors, they ensure consistent contact across the frame perimeter even as the door settles or the frame shifts.
These gaskets hold themselves in place during installation, no fasteners needed, but they require ferrous metal frames; stainless steel or aluminum won't work. The profile must match your frame dimensions exactly, a gasket rated for a 3/8-inch frame won't seal on a 1/2-inch frame.
Compression and Snap-In Gaskets
Compression gaskets rely on pressure from the door closing against the frame, compressing the material to create a seal. They're common on older walk-in units and simpler frame designs.
Snap-in gaskets have a retaining lip that locks into a groove in the door frame, staying in place mechanically. They're easy to replace, slide the old gasket out and snap the new one in, but the retainer groove must be clean and undamaged.
Wiper and Sweep Gaskets
Wiper gaskets have a flexible lip that drags across the frame as the door closes, wiping away condensation and debris; sweep gaskets do the same with a broader contact surface. Both reduce frost buildup by keeping moisture out of the seal area.
They excel in high-humidity environments like seafood storage or produce prep, where condensation is constant. Less common than magnetic or snap-in types, they're essential if ice forms on the door frame, though the flexible lip wears faster, shortening replacement intervals.
Measuring and Identifying Your Current Gasket
Accurate measurements prevent ordering the wrong gasket: too small won't seal, too large won't fit the retainer or compress properly.
Measure the height and width of the door opening, then the frame perimeter where the gasket sits. Most commercial walk-in doors are 36, 42, or 48 inches wide and 80 to 90 inches tall, but custom installations are common.
Next, identify the gasket profile. Remove a small section if possible and compare it to manufacturer diagrams: is it magnetic (visible metal strips), does it have a snap-in lip, and what's the cross-sectional shape? Photograph it from multiple angles.
Check your door documentation or the frame for a model number or manufacturer name; Leer, Norlake, and other major manufacturers stamp this on the frame or door panel.
If you can't find documentation, contact the original manufacturer with your model number to confirm the profile and get OEM part numbers. Otherwise, measure the gasket's cross-sectional width and height and note whether it's magnetic, snap-in, or compression so suppliers can match a compatible replacement.
Walk-in Freezer Door Frost Buildup and Gasket Performance
Frost on the outside of a freezer door signals a failing gasket. Warm, humid kitchen air leaks through gaps in the seal and condenses immediately, forming ice crystals on the frame and door surface.
A functioning walk-in freezer door gasket maintains an airtight seal, keeping cold air in and warm air out. When it degrades, frost accumulates within hours of a busy service period, increasing door weight, making it harder to open and close, and eventually causing it to bind on the frame.
Every air leak forces your compressor to run longer cycles. Over a year, that's measurable energy waste.
Averon Cooling Solutions designs walk-in freezer doors with anti-condensate heater wire and heated frames to combat this, warming the frame slightly to prevent frost even if the gasket develops minor leaks. The gasket remains the primary defense, so replacing it promptly keeps your system efficient and prevents compressor strain that shortens equipment life.
Walk-in Freezer Door Gasket Installation and Removal
Installing a new gasket takes 30 minutes to an hour with the right tools and a methodical approach. The process varies slightly by gasket type, but the fundamentals are identical.
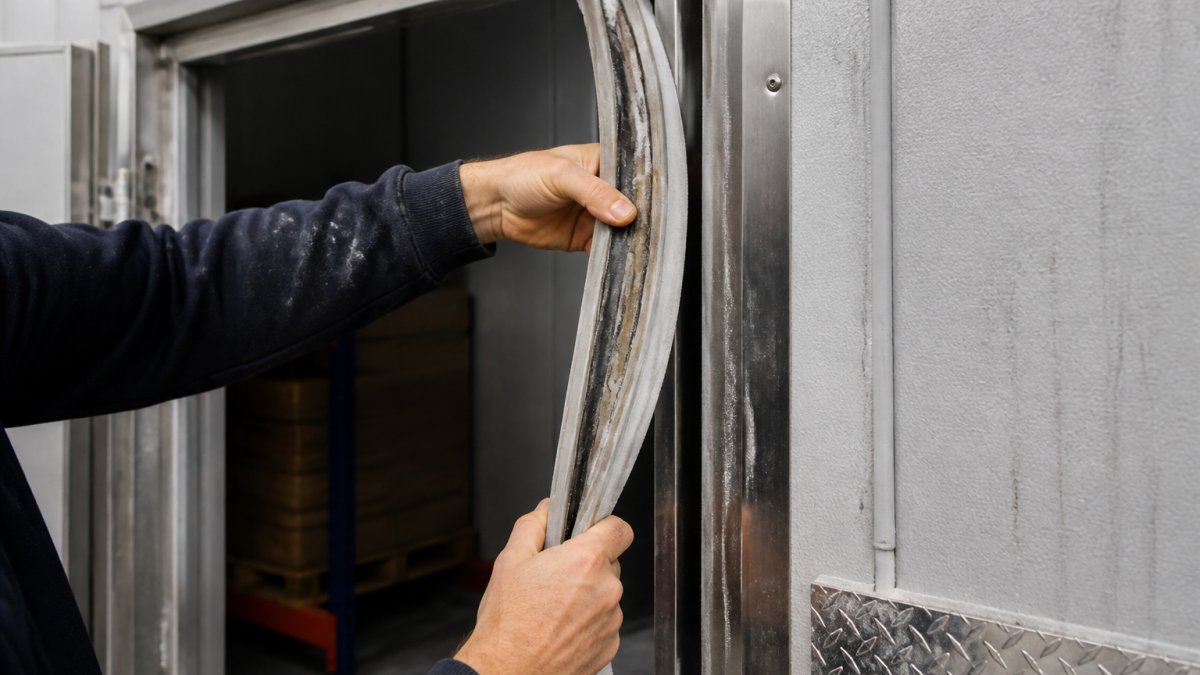
Removing a Worn Gasket
Prop the door open with a rubber wedge or block. Inspect the gasket retainer, the channel where the gasket sits, for ice or debris, and clean it with a plastic scraper or soft brush. Avoid metal tools that could scratch the retainer.
For magnetic gaskets, grip near a corner and pull steadily around the perimeter, freeing each section completely before moving on. For snap-in gaskets, locate the snap points (usually every 12 inches) and gently pry the lip out of the groove with a plastic tool, working methodically to avoid damaging the groove.
Once removed, clean the entire retainer channel with a damp cloth and let it dry completely; moisture or debris will prevent the new gasket from sealing.
Installing a New Gasket
Lay out the new gasket and inspect it for damage. Verify the length matches your frame perimeter, especially for custom sizes.
For magnetic gaskets, start at the top center and press firmly into the retainer channel, working down both sides with the magnetic strip flush against the frame and no twists or bunching. At the bottom corners, overlap the ends by about 2 inches, trim the excess with a utility knife, and seal the joint with food-grade silicone caulk if the manufacturer recommends it.
For snap-in gaskets, feed the gasket into the retainer groove from the top center, pressing firmly so the snap lip engages fully with slight resistance. Work around the perimeter, overlap the ends at the starting point, trim excess, and seal the joint if needed.
Close the door gently and inspect the seal. The gasket should compress evenly with no visible gaps; if gaps appear, it may not be seated fully, or the frame may be warped, which requires professional repair or door replacement.
Common Installation Mistakes
The most frequent error is failing to clean the retainer channel first. Frost, dust, or old gasket material prevents proper seating, and even a small gap undermines the entire seal.
Another mistake is ordering the wrong profile: magnetic gaskets won't work on non-ferrous frames, snap-in gaskets need a retainer groove, and compression gaskets require enough closing force to compress the material. Verify your frame type and profile before ordering.
Improper overlap at the gasket joint causes leaks. The ends must overlap by at least 2 inches and be sealed securely; skipping this step lets temperature cycling separate them over weeks of operation.
OEM vs. Compatible Replacement Gaskets
OEM gaskets are made by the original door builder, Leer, Norlake, or whoever made your unit. They're engineered to exact specifications for your door model and carry the manufacturer's warranty.
Compatible gaskets are made by third-party suppliers to match OEM dimensions and performance. They cost less but require careful verification that the profile and dimensions match exactly; a slightly off-spec gasket may fit loosely or not at all.
For a single replacement, the savings may justify the risk if you verify dimensions carefully. For multiple units, OEM gaskets ensure consistency and reduce troubleshooting.
Buy compatible gaskets from suppliers specializing in commercial refrigeration parts who can provide dimension drawings. Verify the cross-section, length, and attachment method match your frame exactly, and request a sample or photo before ordering if possible.
When to Replace the Entire Walk-in Freezer Replacement Door
Sometimes the gasket isn't the real problem. If the door frame is severely warped, corroded, or damaged, a new gasket alone won't fix frost and air leakage. Signs you need a full door replacement:
- Visible bending or warping of the frame that prevents the door from closing flush
- Corrosion or rust on the frame surface, particularly around the gasket retainer
- A cracked or splintered door panel that allows air to bypass the gasket entirely
- Hinges that no longer hold the door in proper alignment
- A gasket retainer groove that's damaged beyond repair
If your door is over 15 years old and you're on your second or third gasket, a full door replacement may be more cost-effective. A new walk-in freezer replacement door brings modern gasket technology, better insulation, and updated hardware that performs more reliably than aging equipment.
Averon Cooling Solutions manufactures custom walk-in freezer doors engineered to your exact rough opening dimensions, with prehung components and hardware already adjusted. This eliminates the guesswork of retrofitting a standard door into a non-standard space, ensuring optimal fit and performance from day one.
Custom-Size Gaskets for Non-Standard Openings
Standard walk-in doors come in common sizes, but many facilities have custom openings. A remodeled kitchen, specialized storage area, or older installation may need a gasket that doesn't fit off-the-shelf dimensions.
Custom-size gaskets are manufactured to your specifications: provide the frame perimeter measurement, gasket profile (magnetic, snap-in, or compression), and cross-sectional dimensions, and the supplier fabricates it to length, ready to install.
Lead time is typically 5 to 10 business days depending on the supplier's schedule. Custom gaskets cost more than standard sizes, but far less than replacing the entire door frame.
To order, measure the frame perimeter precisely (height plus width plus height plus width, accounting for offsets), identify the gasket type and cross-sectional dimensions, and give your supplier a photo of the existing gasket if possible.
Frost on your freezer door and rising energy bills often point to a single culprit: a failing walk-in freezer door gasket.
Averon Cooling Solutions specializes in custom walk-in freezers and replacement doors engineered to your exact specifications, including gasket systems designed to prevent frost and air leakage.
| Gasket Type | Best For | Installation Method | Cost Range |
|---|---|---|---|
| Magnetic | Modern frames with ferrous metal surfaces | Press into retainer channel | $150-$300 |
| Snap-In | Frames with retainer grooves; straightforward replacement | Snap into groove; mechanical engagement | $120-$250 |
| Compression | Older doors; simple frame designs | Door compression creates seal | $100-$220 |
| Wiper/Sweep | High-humidity environments; frost prevention | Press into retainer with flexible lip | $140-$280 |
| Custom-Size | Non-standard openings; specialized dimensions | Depends on profile type | $180-$400 |
Frequently Asked Questions
How do I know if a walk-in freezer door gasket needs replacing?
Inspect the gasket for visible cracks, tears, hardening, or permanent deformation. If the gasket no longer compresses when pressed, or if you see frost buildup around the door frame, the seal is failing. Check for cold air leakage by holding your hand near the door edges, you'll feel a draft if the gasket isn't sealing properly. Most commercial freezer door gaskets last 3-5 years depending on usage and maintenance.
Can a damaged gasket cause frost buildup in a walk-in freezer?
Yes. A worn or damaged gasket allows warm air to enter the freezer, forcing the refrigeration system to work harder to maintain temperature. This increased cold-air loss leads to frost accumulation on the door, frame, and interior surfaces. Replacing the gasket restores the seal and prevents the temperature fluctuations that cause frost formation. This also reduces energy waste and operating costs.
Are walk-in freezer door gaskets universal, or do I need a specific fit?
Gaskets are not universal. They must match your door's gasket profile, dimensions, and mounting system. OEM gaskets are designed for specific door models and brands. Compatible replacements are available from aftermarket suppliers but must match your door's exact dimensions and profile type. Custom-size gaskets are available for non-standard or older equipment. Always measure your existing gasket or door frame and confirm brand/model compatibility before ordering.
When should I replace the entire walk-in freezer replacement door instead of just the gasket?
Replace the entire door if the frame is bent or damaged, the door no longer closes properly even with a new gasket, the latch mechanism is broken, or the door has visible rust or structural damage. If the gasket alone doesn't stop frost buildup or air leakage, the door frame may be warped. For older doors with multiple failed components, a new prehung door with hardware already installed is often more cost-effective and reliable than repeated repairs.