
Custom Walk-In Cooler for Small Spaces: Planning Guide
October 12, 2026
Table of Contents
- Measure Your Space and Define Custom Dimensions
- Select Walk-In Cooler Panels and Insulation
- Decide on Walk-In Cooler Door Options
- Calculate Walk-In Cooler Cost and Total Ownership
- Choose Between Custom Units, Modular Panels, and DIY Build
- Plan Installation, Ventilation, and Drainage
- Common Installation Mistakes to Avoid
- Conclusion
- Frequently Asked Questions
Last Updated: October 12, 2026
Measure Your Space and Define Custom Dimensions
A custom walk-in cooler for small spaces starts with precise measurements. Most projects stumble here: teams eyeball the space or trust outdated blueprints.

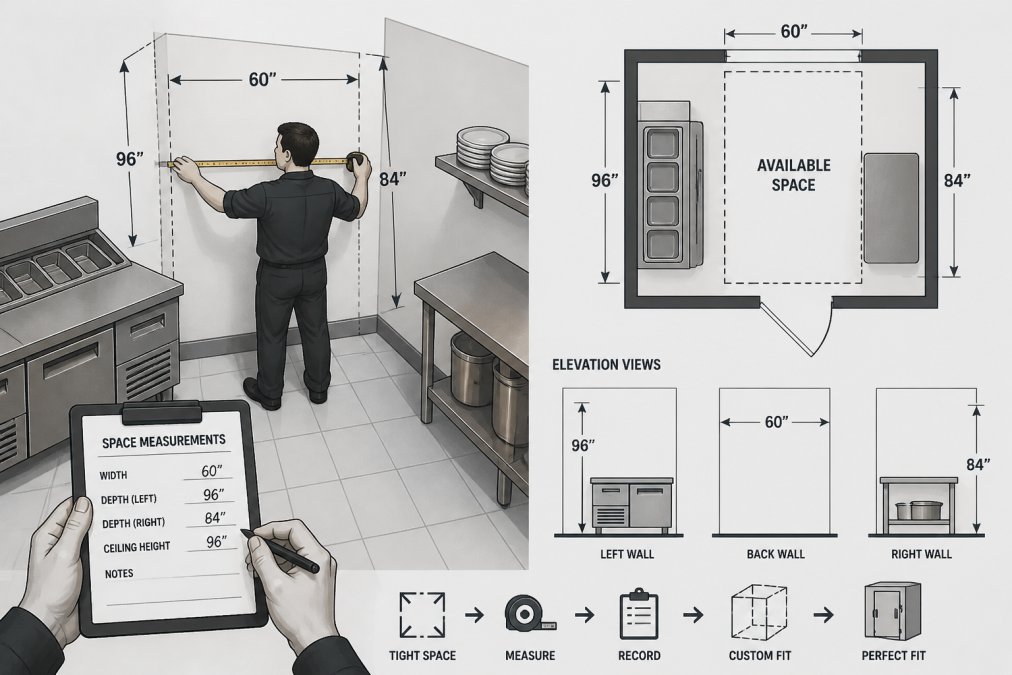
The cooler's location determines floor condition, ceiling height, wall composition, proximity to electrical outlets, and drainage access.
Create a Site Sketch and Document Rough Opening
Document rough opening width, depth, and height in inches, measuring at three points per dimension (top/middle/bottom, left/center/right) because walls are rarely square or plumb.
Note obstacles: support columns, shelving, electrical panels, plumbing, HVAC ducts, or beams. A cooler that fits the floor footprint but conflicts with an overhead beam is useless.
Sketch or photograph the space from multiple angles, marking where the door will swing or slide. If replacing an existing cooler, note the old door's swing direction, it often indicates the best hinge placement.
Account for Clearances and Utility Access
Beyond the rough opening, you need clearance around the unit: refrigeration equipment requires air circulation, and doors must swing or slide without hitting walls or equipment.
Plan at least 12 inches behind the cooler for airflow, plus 6-12 inches for a rear-mounted condenser. Measure the door swing radius or slide path.
Walk-in coolers require dedicated 208-240V circuits depending on compressor size. Verify your panel can handle the load and that you have a clear path to run power; don't assume existing outlets are adequate.
Most walk-in coolers need floor drains or condensate removal lines. If your space lacks drainage, install it before the cooler arrives, a common hidden cost.
Select Walk-In Cooler Panels and Insulation
The panel system determines how well your custom walk-in cooler for small spaces maintains temperature and resists condensation, differences show up in energy bills and frost prevention.
Compare Panel Construction and Thermal Performance
Walk-in cooler panels use tongue-and-groove insulation between metal skins, usually polyurethane or polystyrene foam rated R-20 to R-30. Thicker panels insulate better but consume floor space, a critical trade-off in small rooms.
Galvanized steel is standard; stainless steel costs more but resists corrosion in humid kitchens. Skin gauge affects durability: 26-gauge is common, 24-gauge heavier and costlier.
Averon Cooling Solutions manufactures panels with cam-action fasteners that lock sections together without external hardware, creating a tight, low-leakage envelope. The tongue-and-groove profile keeps panels flush, reducing thermal bridging.
For freezers, insulation thickness matters more because the temperature differential is greater.
Choose Floor, Ceiling, and Wall Configuration
In small spaces you often can't sacrifice floor area to a raised platform. Slab-on-grade is common but requires proper drainage and vapor barrier protection; raised floors add height and cost but improve airflow and simplify cleaning.
Ceiling height is fixed by your building, but cooler ceiling panel thickness is not. A drop or suspended cooler ceiling saves headroom in tight spaces; recessed ceilings integrate with existing drop-ceiling systems but require custom framing.
Wall configuration depends on whether you're building a standalone box or converting an existing room. A standalone walk-in box (what Averon manufactures) comes as a complete panel kit; a converted room uses existing walls and needs panels only on exposed sides.
Decide on Walk-In Cooler Door Options
Door selection shapes workflow and operating costs. The wrong choice for a small space can waste energy, create bottlenecks, or leave frost untreated.
Swing Doors vs. Sliding Doors for Compact Layouts
Swing doors are traditional and cheaper, but their arc requires clear floor space, which in a small kitchen can conflict with prep tables, shelving, or foot traffic. Sliding doors consume no swing radius, they glide along a track parallel to the wall, ideal for tight spaces. They cost more but save operational headaches in congested areas.
In high-traffic locations (bakeries, delis, warehouses), sliding doors reduce congestion and improve throughput, letting staff and forklifts move without waiting for a swing door to clear.
The trade-off: sliding doors need more maintenance. Averon Cooling Solutions offers sliding doors with heavy-duty tracks and replaceable sweep gaskets.
Door Size, Placement, and Hinge Direction
Standard door sizes are 36" × 78" for single-person access or 40" × 84" for forklifts; custom sizes cost more. In a small space, right-sizing matters: an oversized door wastes cooled air with each cycle.
Hinge placement affects workflow. If your prep area is left of the cooler, a left-hinged door opens toward prep, reducing walking distance; if product flows right to left, a right-hinged door makes sense.
For freezer doors, heated frames and anti-condensate heater wire prevent frost and ice buildup around the frame, common in humid kitchens. Averon Cooling Solutions includes heated frame options on freezer doors.
Calculate Walk-In Cooler Cost and Total Ownership
Purchase price is only part of the equation. Operating costs, maintenance, and lifespan determine true cost of ownership: a cheap unit that runs constantly and breaks down costs more over five years than a properly specified, efficient system.
Purchase Price and Refrigeration Equipment
A basic 8' × 8' × 8' walk-in cooler box from Averon Cooling Solutions starts at $8,073.00, including the insulated panel structure, prehung door with hardware, magnetic gaskets, and interior safety release. Sliding doors cost more: a 36" × 78" sliding door with jamb sandwich frame is $2,898.00; a 40" × 84" sliding door is $3,623.00.

Refrigeration equipment (compressor, condenser, evaporator) is often purchased separately and installed by a licensed technician. Budget $3,000-$8,000 for a complete system for an 8' × 8' box. High-efficiency scroll compressors cost more upfront but reduce operating costs.
Heated frames and anti-condensate heater wire for freezer doors prevent costly frost-related maintenance and product damage.
Operating Costs and Energy Efficiency
A properly sized walk-in cooler runs 8-12 hours per day in most food-service settings. Energy consumption depends on insulation quality, door sealing, ambient temperature, and compressor efficiency.
High-efficiency compressors and thick insulation can reduce operating costs. In a small space where you cannot add a second unit, efficiency matters: a unit that runs constantly wastes money and generates excess heat.
Maintenance costs are minimal if seals are intact and drains are clear. An unnoticed leaking door gasket can increase energy consumption.
8' x 8' x 8' Walk-In Cooler or Freezer Box →
Choose Between Custom Units, Modular Panels, and DIY Build
Three paths exist: buy a manufactured walk-in cooler, assemble modular panels yourself, or build from scratch with standard materials and a separate refrigeration system.
Manufactured units like Averon Cooling Solutions's boxes arrive as complete systems with engineered, tested, prehung panels: you bolt them together, install refrigeration, and connect power.
DIY builds using existing walls and aftermarket refrigeration are cheapest upfront but risky: thermal leaks are common, frost buildup on unsealed joints causes condensation damage, and warranty coverage is limited when mixing manufacturers.
For small spaces, a manufactured custom unit is usually best: the tight tolerances required in a confined space are hard to achieve with modular or DIY approaches.
Plan Installation, Ventilation, and Drainage
Installation logistics determine whether your cooler arrives on time and functions properly. Ventilation and drainage are often overlooked until problems arise.
Indoor vs. Outdoor Installation and Site Selection
Indoor installation is standard for kitchens and storage rooms: the cooler occupies floor space but protects equipment from weather and theft. Outdoor installation is less common but sometimes necessary when indoor space is unavailable, requiring weatherproof condenser enclosures, extended electrical runs, and sun protection.
Avoid placing the cooler next to heat sources (ovens, dishwashers, steam tables), the condenser works harder against nearby heat, wasting energy. Place it in the coolest part of your facility if possible.
Ensure adequate ventilation. Condenser fans must exhaust warm air away from the unit; if it recirculates into the intake, efficiency drops and compressor run-time increases. In small kitchens, consider ducting condenser exhaust to the exterior.
Electrical, Heat Rejection, and Permit Requirements
Walk-in coolers require dedicated 208-240V circuits. Never plug one into a shared kitchen circuit, the compressor draw will trip breakers and damage other equipment.
Have a licensed electrician verify panel capacity and proper grounding; improper grounding causes equipment damage and safety hazards.
Heat rejection is the warm air expelled by the condenser. In a small kitchen it raises ambient temperature, making the cooler work harder.
Permits are required in most jurisdictions for commercial refrigeration.
Averon Cooling Solutions can advise on permit requirements during quoting, but you or your contractor are responsible for obtaining permits and scheduling inspections.
Common Installation Mistakes to Avoid
Learning from others' errors saves time and money. These mistakes recur in small-space installations.
Undersizing the door. Teams choose the smallest door that fits to save cost, then struggle with throughput.
Ignoring electrical clearance. Running power to a cooler in a tight corner often requires rerouting circuits or adding new runs.
Failing to seal the floor drain. Without proper drainage, condensate pools under the cooler and causes mold and structural damage.
Placing the cooler too close to a wall. Compressor heat rejection requires airflow; a cooler wedged into a corner will overheat.
Skipping the door gasket check. A worn gasket is invisible until your energy bill spikes.
Mixing refrigeration equipment brands. Compressors, condensers, and evaporators are designed to work together.
Conclusion
A custom walk-in cooler for small spaces requires careful planning.
The choice between a manufactured unit, modular panels, and a DIY build depends on your timeline, budget, and risk tolerance.
Averon Cooling Solutions manufactures walk-in coolers built to your exact specifications, with prehung doors, heated frames, and anti-condensate technology. Our 8' × 8' × 8' walk-in cooler box starts at $8,073.00 and ships nationwide with 3-4 week lead time. Get a quote today for custom dimensions that fit your space perfectly.
| Planning Step | Key Decision | Impact on Performance |
|---|---|---|
| Measure rough opening | Document width, depth, height at three points | Ensures unit fits without modification |
| Account for clearances | Plan 12"+ behind cooler, 6-12" for condenser | Prevents overheating and maintains efficiency |
| Select panel insulation | Choose R-20 to R-30 based on temperature | Affects energy costs and frost prevention |
| Choose door type | Swing vs. sliding based on traffic flow | Determines workflow efficiency and air loss |
| Calculate operating costs | Budget $1,300-$3,500 annually based on efficiency | Informs true cost of ownership |
| Verify electrical | Confirm dedicated 208-240V circuit available | Prevents breaker trips and equipment damage |
| Plan drainage | Install floor drain or condensate line | Prevents mold and structural damage |
EXTERNAL SOURCES:
According to ASHRAE refrigeration equipment standards, commercial walk-in coolers must maintain specified temperature ranges with insulation rated for the application. Building codes in most jurisdictions reference ASHRAE standards for cold storage design.
The EPA energy efficiency guidance for commercial refrigeration recommends regular maintenance of door gaskets and condenser coils to optimize energy performance.
Research from Food Safety News on temperature control requirements emphasizes that consistent temperature maintenance in walk-in coolers is critical for food safety compliance and product shelf life.
Frequently Asked Questions
How do I measure my space for a custom walk-in cooler?
Measure the height, width, and depth of your rough opening in inches. Record the distance from walls to nearby equipment, electrical outlets, and doorways. Note obstructions like pipes, vents, or structural beams. Account for 6 inches of clearance on at least two sides for air circulation and maintenance access. A site sketch with dimensions and photos helps manufacturers confirm your space can accommodate a custom unit without expensive modifications.
What is the cost difference between a custom walk-in cooler and a standard size?
Custom walk-in coolers are built to your exact dimensions, ensuring a perfect fit for irregular spaces. An 8' x 8' x 8' standard walk-in cooler box starts at $8,073. Pricing scales with custom dimensions, panel materials, refrigeration equipment, and door type. Sliding doors range from $2,898 to $3,623 depending on width and height. Request a quote with your site measurements for an accurate total cost that reflects your specific layout and specifications.
What clearances does a walk-in cooler need around it?
Walk-in coolers require 6 to 12 inches of clearance on sides where air circulation and condenser heat rejection occur. Leave at least 18 inches in front of the door for safe entry and equipment access. Verify electrical outlet and breaker locations. Check local health codes and food-safety regulations, some jurisdictions require additional clearance for inspections or emergency access.
Can walk-in cooler panels be customized for oddly-shaped spaces?
Yes. Custom walk-in cooler panels are manufactured to your exact dimensions, so they fit irregular rooms, alcoves, or spaces where standard sizes won't work. Insulated tongue-and-groove panels lock together with cam-action fasteners, allowing flexible layout configurations. You can specify cooler and freezer combinations, partial floor coverage, or ceiling height variations. Submit your site sketch and measurements to confirm feasibility and receive a custom quote tailored to your space.